 Our online courses
 HTML/CSS
 JavaScript
'%3e%3cpath%20d='M23.5602%2010.93L13.0602%200.430002C12.774%200.158498%2012.3946%200.00714111%2012.0002%200.00714111C11.6057%200.00714111%2011.2263%200.158498%2010.9402%200.430002L8.94018%202.43C8.89332%202.47648%208.85612%202.53178%208.83074%202.59271C8.80535%202.65364%208.79228%202.719%208.79228%202.785C8.79228%202.85101%208.80535%202.91636%208.83074%202.97729C8.85612%203.03822%208.89332%203.09352%208.94018%203.14L10.7402%205C10.8095%205.06923%2010.8977%205.11656%2010.9937%205.13611C11.0897%205.15567%2011.1893%205.14659%2011.2802%205.11C11.5851%204.99232%2011.9142%204.95115%2012.2387%204.9901C12.5632%205.02905%2012.8732%205.14693%2013.1416%205.33342C13.41%205.51992%2013.6286%205.76934%2013.7782%206.05988C13.9279%206.35041%2014.0041%206.6732%2014.0002%207C13.9976%207.25396%2013.9467%207.5051%2013.8502%207.74C13.8136%207.83089%2013.8045%207.93052%2013.8241%208.02652C13.8436%208.12253%2013.891%208.21067%2013.9602%208.28L15.7202%2010C15.7895%2010.0692%2015.8777%2010.1166%2015.9737%2010.1361C16.0697%2010.1557%2016.1693%2010.1466%2016.2602%2010.11C16.6565%209.95224%2017.0928%209.9253%2017.5055%2010.0331C17.9182%2010.1409%2018.2856%2010.3779%2018.554%2010.7093C18.8225%2011.0407%2018.978%2011.4493%2018.9978%2011.8754C19.0176%2012.3014%2018.9006%2012.7227%2018.664%2013.0776C18.4274%2013.4325%2018.0836%2013.7024%2017.6827%2013.848C17.2818%2013.9936%2016.8448%2014.0073%2016.4356%2013.8869C16.0264%2013.7666%2015.6664%2013.5185%2015.4082%2013.1791C15.1499%2012.8396%2015.007%2012.4265%2015.0002%2012C15.0033%2011.7568%2015.0507%2011.5162%2015.1402%2011.29C15.1747%2011.2004%2015.1826%2011.1028%2015.1631%2011.0088C15.1436%2010.9148%2015.0975%2010.8285%2015.0302%2010.76L13.3502%209.07C13.2803%209.00148%2013.1918%208.95498%2013.0958%208.93626C12.9997%208.91754%2012.9003%208.92742%2012.8098%208.96469C12.7193%209.00195%2012.6417%209.06496%2012.5867%209.14589C12.5316%209.22683%2012.5016%209.32214%2012.5002%209.42V14.7C12.4998%2014.7976%2012.5281%2014.8931%2012.5814%2014.9749C12.6347%2015.0566%2012.7107%2015.121%2012.8002%2015.16C13.2213%2015.3438%2013.5663%2015.667%2013.7772%2016.0752C13.988%2016.4835%2014.0519%2016.9519%2013.958%2017.4017C13.8641%2017.8514%2013.6182%2018.2552%2013.2617%2018.545C12.9051%2018.8348%2012.4597%2018.993%2012.0002%2018.993C11.5407%2018.993%2011.0952%2018.8348%2010.7387%2018.545C10.3821%2018.2552%2010.1362%2017.8514%2010.0424%2017.4017C9.9485%2016.9519%2010.0124%2016.4835%2010.2232%2016.0752C10.4341%2015.667%2010.7791%2015.3438%2011.2002%2015.16C11.2896%2015.121%2011.3657%2015.0566%2011.419%2014.9749C11.4723%2014.8931%2011.5005%2014.7976%2011.5002%2014.7V9.28C11.5005%209.18242%2011.4723%209.08687%2011.419%209.00513C11.3657%208.92339%2011.2896%208.85904%2011.2002%208.82C10.7271%208.61271%2010.3526%208.23047%2010.1551%207.7533C9.95748%207.27612%209.95215%206.74102%2010.1402%206.26C10.171%206.16762%2010.1742%206.06826%2010.1493%205.97411C10.1244%205.87995%2010.0726%205.79511%2010.0002%205.73L8.19018%203.88C8.1437%203.83314%208.0884%203.79594%208.02747%203.77056C7.96654%203.74517%207.90119%203.7321%207.83518%203.7321C7.76918%203.7321%207.70383%203.74517%207.6429%203.77056C7.58197%203.79594%207.52667%203.83314%207.48018%203.88L0.480184%2010.88C0.199283%2011.1613%200.0415039%2011.5425%200.0415039%2011.94C0.0415039%2012.3375%200.199283%2012.7188%200.480184%2013L10.9802%2023.51C11.2614%2023.7909%2011.6427%2023.9487%2012.0402%2023.9487C12.4377%2023.9487%2012.8189%2023.7909%2013.1002%2023.51L23.6002%2013C23.8811%2012.7188%2024.0389%2012.3375%2024.0389%2011.94C24.0389%2011.5425%2023.8811%2011.1613%2023.6002%2010.88L23.5602%2010.93Z'%20fill='white'/%3e%3c/g%3e%3cdefs%3e%3cclipPath%20id='clip0_1481_6122'%3e%3crect%20width='24'%20height='24'%20fill='white'/%3e%3c/clipPath%3e%3c/defs%3e%3c/svg%3e) Git
Git'%3e%3cpath%20d='M16.6011%202.00588H15.7556L15.7372%201.99342C15.0469%201.51665%2013.7032%200.590486%2011.8634%200.855279C11.8664%200.859491%2011.8678%200.864404%2011.8706%200.868615C10.5059%201.09463%208.97767%202.15872%208.46774%203.59394C7.97588%204.97669%208.35649%206.63985%209.60026%208.53868L11.5022%2011.4449C14.3783%2010.0069%2014.2755%207.81624%2014.2142%206.50737C14.2051%206.31452%2014.1991%206.17502%2014.1991%206.05113C14.1991%205.67842%2014.5008%205.37695%2014.8733%205.37695C15.246%205.37695%2015.5475%205.67842%2015.5475%206.05113C15.5475%206.15589%2015.5535%206.27433%2015.5594%206.40278C15.6279%207.8645%2015.7661%2010.8206%2012.1054%2012.651C11.8769%2012.7654%2011.4979%2012.9909%2011.2673%2012.9909C11.046%2012.9909%2010.8307%2012.8822%2010.7024%2012.6861L8.47178%209.27743C6.98567%207.00712%206.55645%204.943%207.19694%203.14226C7.3396%202.7413%207.53614%202.39631%207.75057%202.07572C3.41438%202.59969%200.00470058%206.30276%200.0029458%2010.8679C-0.0130225%2011.5476%20-0.0270607%2013.6156%201.77508%2016.2716C2.40451%2017.2%202.73774%2018.3601%202.73774%2019.6268V21.558C2.73774%2021.9307%203.03921%2022.2321%203.41192%2022.2321H6.10864C6.48135%2022.2321%206.77387%2021.9307%206.77387%2021.558V18.1869H9.47971V21.558C9.47971%2021.9307%209.78136%2022.2321%2010.1541%2022.2321H12.8508C13.2235%2022.2321%2013.516%2021.9307%2013.516%2021.558C13.516%2018.9434%2014.0603%2016.6015%2015.1625%2014.3978L15.9283%2012.8663L17.2293%2013.083C18.2082%2013.2462%2018.9187%2014.085%2018.9187%2015.078V16.1643C18.9187%2016.7167%2018.1609%2017.0328%2017.7678%2016.6409C17.5046%2016.3776%2017.0778%2016.3776%2016.8144%2016.6409L14.9089%2018.5464C14.6457%2018.8098%2014.6457%2019.2364%2014.9089%2019.4998C16.0501%2020.6421%2017.6769%2021.1082%2019.2571%2020.7462C21.2666%2020.2859%2023%2018.0539%2023%2015.8725V8.36864C23%204.86%2020.1099%202.00588%2016.6011%202.00588ZM18.2446%208.74802C17.8724%208.74802%2017.5704%208.44603%2017.5704%208.07367C17.5704%207.70131%2017.8724%207.39949%2018.2446%207.39949C18.6169%207.39949%2018.9189%207.70131%2018.9189%208.07367C18.9189%208.44603%2018.6169%208.74802%2018.2446%208.74802Z'%20fill='white'/%3e%3c/g%3e%3cdefs%3e%3cclipPath%20id='clip0_1481_6112'%3e%3crect%20width='23'%20height='23'%20fill='white'/%3e%3c/clipPath%3e%3c/defs%3e%3c/svg%3e) PHP
PHP Freelance
'%3e%3cpath%20d='M1.41413%2011.974C1.49937%2011.9879%201.58563%2011.9944%201.67193%2011.9932L16.3679%2011.9933L16.0474%2012.1435C15.7342%2012.293%2015.4492%2012.4964%2015.2053%2012.7445L11.0842%2016.899C10.5414%2017.4214%2010.4502%2018.2616%2010.8681%2018.8899C11.3544%2019.5594%2012.287%2019.7048%2012.9512%2019.2145C13.0048%2019.1749%2013.0558%2019.1317%2013.1038%2019.0852L20.556%2011.5725C21.1384%2010.9861%2021.1389%2010.0347%2020.5572%209.44762C20.5568%209.44725%2020.5564%209.44682%2020.556%209.44645L13.1038%201.93376C12.5209%201.34781%2011.5772%201.34913%2010.9959%201.93671C10.9502%201.98296%2010.9075%202.03217%2010.8681%202.08401C10.4502%202.7123%2010.5414%203.55255%2011.0842%204.07487L15.1978%208.2369C15.4165%208.45759%2015.6679%208.64264%2015.9431%208.78533L16.3902%208.98817L1.75396%208.98817C0.992568%208.95967%200.324563%209.49584%200.181527%2010.2503C0.0497616%2011.0694%200.601603%2011.8411%201.41413%2011.974Z'%20fill='white'/%3e%3c/g%3e%3cdefs%3e%3cclipPath%20id='clip0_520_10'%3e%3crect%20width='20.8311'%20height='21'%20fill='white'%20transform='translate(20.9932%2021)%20rotate(-180)'/%3e%3c/clipPath%3e%3c/defs%3e%3c/svg%3e)
'%3e%3cpath%20d='M50.2142%2018.9386C49.891%2017.9389%2049.0043%2017.2289%2047.9552%2017.1343L33.7053%2015.8404L28.0704%202.65157C27.655%201.685%2026.7087%201.05933%2025.6574%201.05933C24.6061%201.05933%2023.6599%201.685%2023.2444%202.65383L17.6096%2015.8404L3.35734%2017.1343C2.31016%2017.2311%201.42571%2017.9389%201.10063%2018.9386C0.775554%2019.9383%201.07577%2021.0349%201.86794%2021.7261L12.6392%2031.1726L9.46301%2045.1637C9.2306%2046.1924%209.62988%2047.2558%2010.4834%2047.8728C10.9423%2048.2043%2011.479%2048.3731%2012.0203%2048.3731C12.487%2048.3731%2012.95%2048.2473%2013.3655%2047.9986L25.6574%2040.6522L37.9448%2047.9986C38.844%2048.5396%2039.9774%2048.4902%2040.8291%2047.8728C41.683%2047.2539%2042.0819%2046.1902%2041.8495%2045.1637L38.6733%2031.1726L49.4446%2021.728C50.2368%2021.0349%2050.5393%2019.9402%2050.2142%2018.9386Z'%20fill='%23FFC107'/%3e%3c/g%3e%3cdefs%3e%3cclipPath%20id='clip0_1229_10547'%3e%3crect%20width='49.3714'%20height='49.3714'%20fill='white'%20transform='translate(0.971436)'/%3e%3c/clipPath%3e%3c/defs%3e%3c/svg%3e)
'%3e%3cpath%20d='M18.6283%2023.5149C18.8912%2023.5149%2019.1524%2023.4328%2019.3752%2023.2717C19.7903%2022.9708%2019.9842%2022.4537%2019.8712%2021.9548L18.3273%2015.1535L23.5635%2010.5615C23.9484%2010.2255%2024.0954%209.69335%2023.9374%209.20646C23.7794%208.72049%2023.3494%208.37642%2022.8404%208.32936L15.9122%207.70038L13.1731%201.29024C12.9711%200.819283%2012.5111%200.515137%2012.0001%200.515137C11.489%200.515137%2011.029%200.819283%2010.8271%201.28914L8.08792%207.70038L1.16086%208.32936C0.650715%208.37532%200.220772%208.72049%200.062748%209.20646C-0.0952761%209.69243%200.0508457%2010.2255%200.435743%2010.5615L5.67196%2015.1526L4.12798%2021.9537C4.01482%2022.4537%204.20891%2022.9708%204.62384%2023.2708C5.03785%2023.5707%205.58993%2023.5938%206.02592%2023.3318L12.0001%2019.7617L17.9742%2023.3338C18.1762%2023.4537%2018.4012%2023.5149%2018.6283%2023.5149ZM12.0001%2018C12%2017.7763%2012.0001%2017.5%2012.0001%2017.5V17V16C12%2015.5%2012%2015%2012.0001%2014.5V12.5V11.5C12%2011%2012.0001%209.18247%2012.0001%209.18247V2.36217L14.5852%208.41231C14.7672%208.84335%2015.1723%209.13944%2015.6421%209.18247L22.1843%209.77648L17.2403%2014.1125C16.8862%2014.4225%2016.7313%2014.8986%2016.8362%2015.3566L18.2923%2021.7757L12.6541%2018.4046C12.4522%2018.2847%2012.0001%2018%2012.0001%2018Z'%20fill='%23FFC107'/%3e%3c/g%3e%3cdefs%3e%3cclipPath%20id='clip0_1843_3872'%3e%3crect%20width='24'%20height='24'%20fill='white'%20transform='matrix(-1%200%200%201%2024%200)'/%3e%3c/clipPath%3e%3c/defs%3e%3c/svg%3e) 4.8 average rating
4.8 average rating
How to host a static website (with SSL) on AWS in just a few minutes!

NicolasBrondinBernard
Deploying a static site online for just a few cents thanks to AWS S3 and CloudFront is possible!

Article published on 07/08/2026, last updated on 09/08/2026
You can say what you want about AWS, its pricing and its not always very understandable interface, but when it comes to hosting static files and its CDN service, there's not much to complain about!
In a previous article, I showed you a simple way to host a static demo on Github, but how do you go about it when you want a production-ready static site?
That's exactly what we're going to look at today, and all you need is a domain name and an activated AWS account!
Create an account today and get 12 months of access to the free tier: https://portal.aws.amazon.com/billing/signup#/start
I should point out that this article is absolutely not sponsored!
1 - Creating the bucket and uploading the files
When we talk about AWS S3, we're not talking about a repository, nor a server, but a bucket.
The advantage of this service is that you can host static files very easily, at low cost, and make them publicly available (or not) through a URL.
Head over to the S3 console: https://s3.console.aws.amazon.com/s3/home
Then, simply click on the "Create bucket" button, choose its name, its location and the access rights. You must allow public access because we're going to host a site, which is by definition, public.
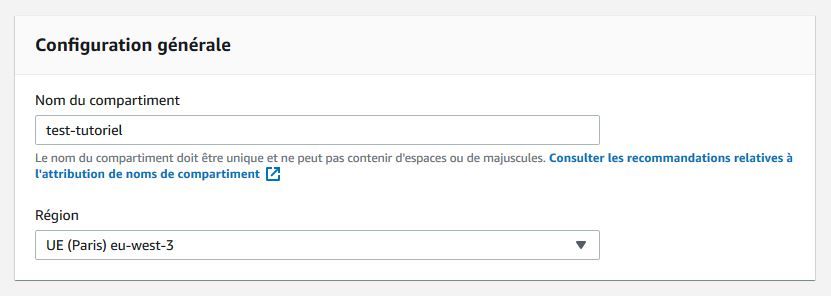
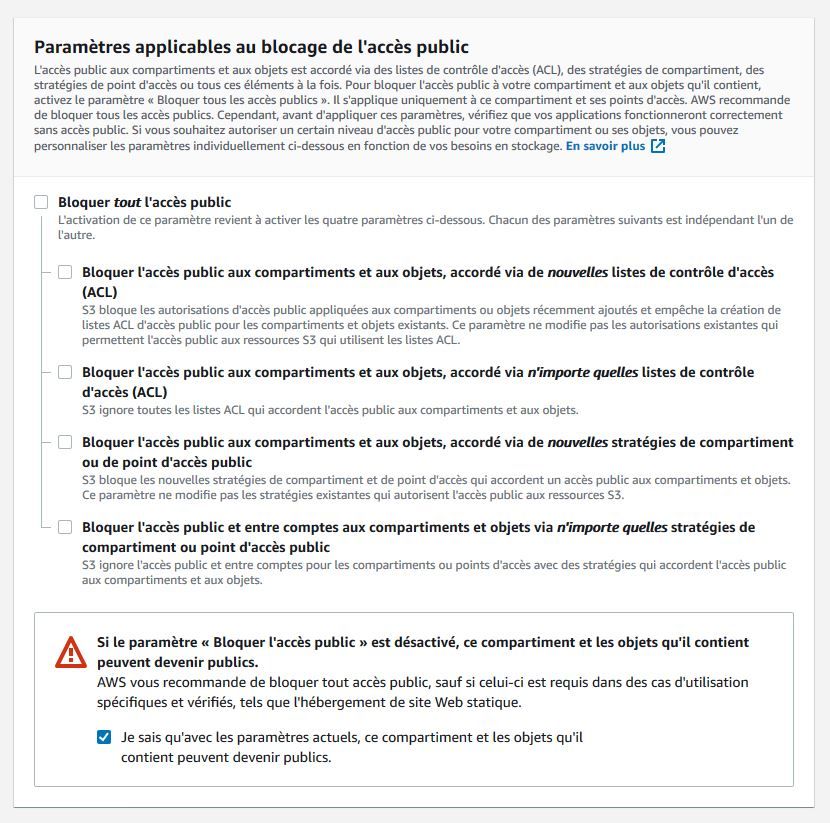
Once that's done, you should end up with an empty bucket, into which all that's left to do is upload your files.
Careful, when you upload the files of your static site, you must allow public read access to the files, otherwise the bucket may refuse you access and return a 403 error.
2 - Bucket configuration
Being able to access your files through a link is great, but that doesn't mean we're already done, because without additional configuration, S3 will return our html files as plain old text files...
And after all, it's right, they're only text files deep down!
But fortunately, by going to the "Configuration" tab you should find a box titled "Static website hosting", by clicking on it, you should be able to enable this option for free and configure it as shown below:
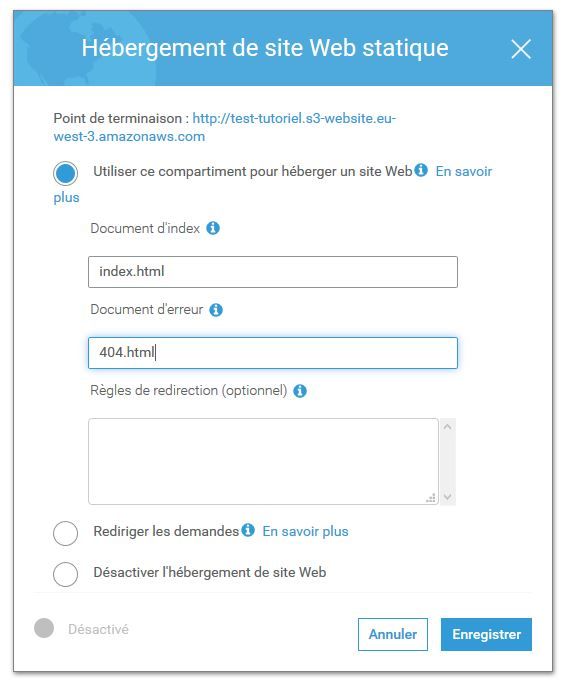
And by magic, AWS should directly provide you with a link to access your website! In the rest of this tutorial, we're going to link our custom domain name to this hosting thanks to Amazon Cloudfront.
Remember to test that the link given by S3 does indeed let you access your site, otherwise redo the previous steps!
3 - Creating the Cloudfront distribution
Cloudfront is Amazon's web services CDN, and it will serve us for four things:
- Make our site easily available everywhere on the globe
- Reduce the read load on our S3 bucket
- Link a custom domain name, and above all...
- Add an SSL certificate to our hosting!
For this, head over to the Cloudfront dashboard: https://console.aws.amazon.com/cloudfront/home
Then, click on the "Create distribution" button and select the classic "web" mode. You should land on a fairly long form, filled with very different fields but don't worry, some are essential, others are simply useful, but we're going to focus on only four of them:
- (Mandatory) In the "Origin domain name" field you're going to copy-paste the url that your S3 bucket provided you with just before. (Be careful to properly copy-paste the url and not select it from the list, this is important)
- (Optional) Then you can enable the "Automatically compress objects" option, this enables gzip compression of your files on the server.
- (Mandatory) In the "Default root object" field, enter "index.html".
- (Optional) You can enter the name of your site in the "Comment" field, this will help you find your way among all your distributions!
At the end, all that's left is to confirm the creation. Deploying a new Cloudfront distribution can take a bit of time, but you should be able to access your new url (at xxxx.cloudfront.net) a few minutes later!
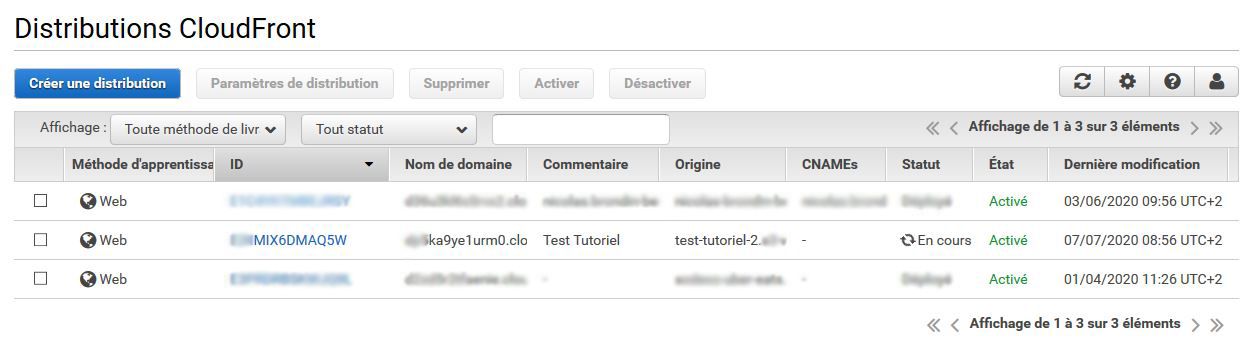
Just like with the S3 url, remember to check that your site is accessible through the Cloudfront url once the distribution has moved to the (Deployed) status
4 - Generating the SSL certificate
Managing SSL certificates with Amazon means you don't have to worry about renewal, and that the certificate integration into other services is very simple.
For this, simply open the "Certificate Manager" available at https://console.aws.amazon.com/acm/home, select "Provision certificates", click on the "Request a certificate" button then on "public certificate.
Then just follow a few simple steps:
- Add your domain names
- Choose DNS validation (skip the section on tags, then confirm the request)
- For each domain, AWS will provide you with a record to add to your DNS configuration (without which Amazon won't be able to verify that the domain belongs to you)
Once these steps are complete, it will take Amazon a few minutes to validate the certificate, your certificate will be available once its status changes to "issued".
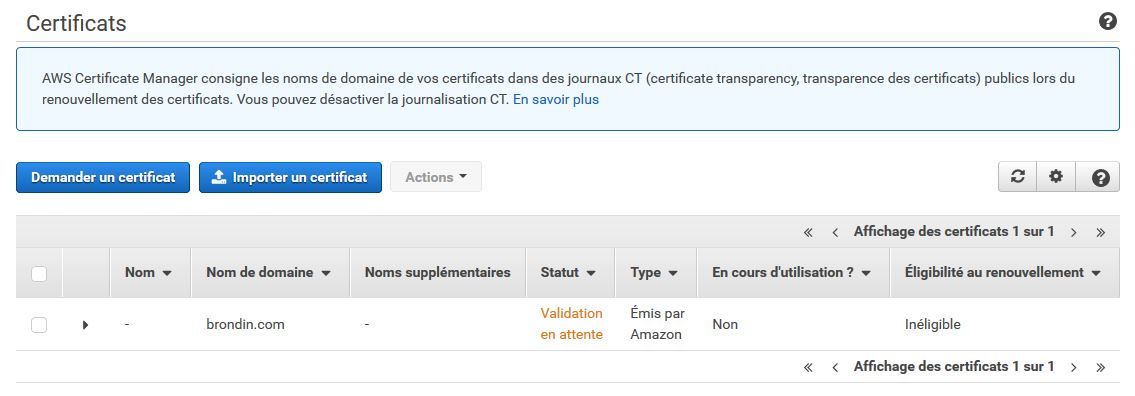
5 - CDN configuration
Most of the configuration was done when creating the Cloudfront distribution, but we still need to link our domain name, enable the SSL certificate and redirect http calls to https!
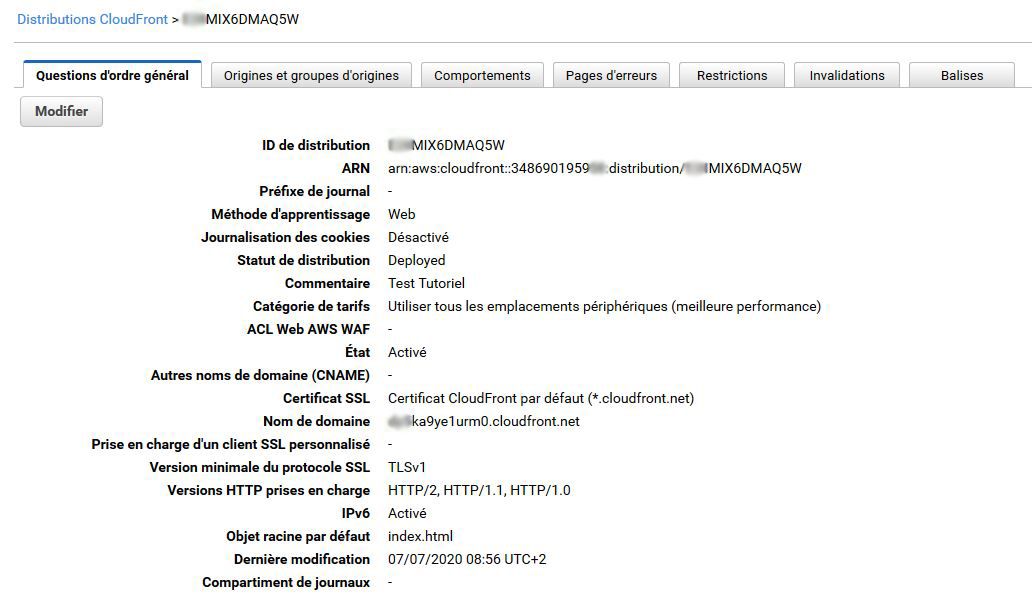
For this, simply go back to your Cloudfront dashboard and click on the distribution ID in question to display all the settings tabs like this:
Domain name and certificate
The first step will be to add our domain name and our certificate, for this, simply click on the "Edit" button in the "General" tab.
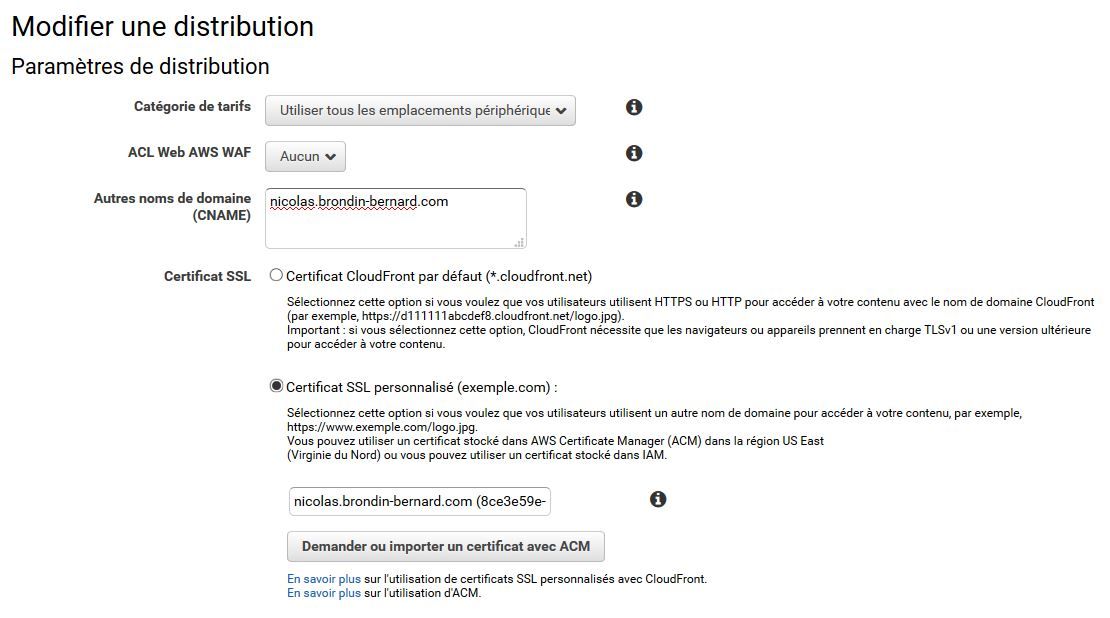
Then, you need to enter your domain names, choose the "Custom SSL Certificate" option and finally choose your freshly issued certificate from the list.
Careful, the Certificate Manager must show the "issued" status next to your certificate, otherwise it won't be visible in the list (if it doesn't appear, try reloading the page).
http to https redirection
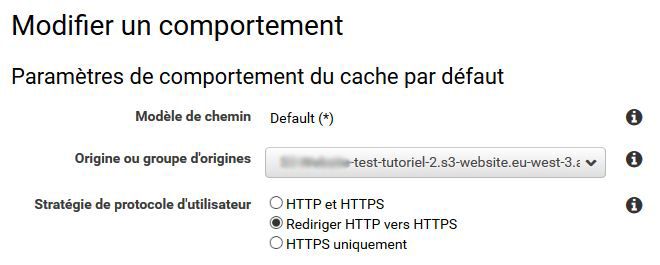
Once that's done, go to the "Behaviors" tab, select the "Default (*)" line and click on the "Edit" button.
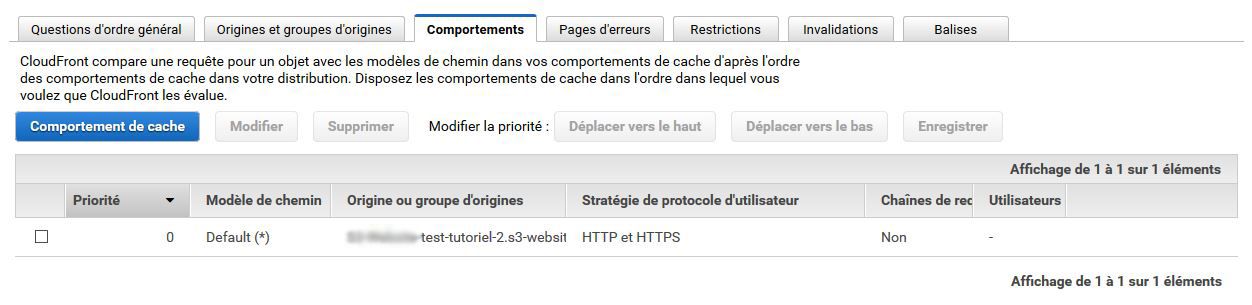
All that's left is to select the "Redirect HTTP to HTTPS" option as shown below:
Update
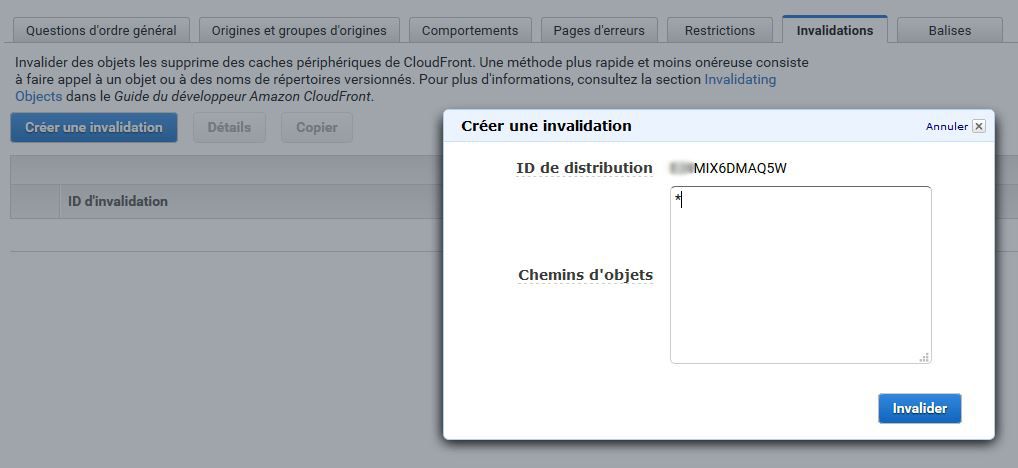
Cloudfront caches as many files as possible to lighten your hosting load, which means that when you modify files, or when you change the CDN configuration, you sometimes need to invalidate the old cached files.
For this, I invite you to click on the "Invalidations" tab, then "Create invalidation" and invalidate the whole cache (*) to make sure you don't run into any issues caused by the configuration change!
6 - DNS configuration
The last step is to add a CNAME record to your DNS manager for your domain, pointing to the xxxx.cloudfront.net url of your distribution.
Once the DNS propagation is complete, your site should appear perfectly with your domain name, and be accessible only over https!
Congratulations, you now know how to publish a static site on AWS! I hope you enjoyed this article, if you run into a problem while following it, don't hesitate to let me know in the comments at the very bottom of the page!
 Our newsletter
'%3e%3cpath%20fill-rule='evenodd'%20clip-rule='evenodd'%20d='M72.5155%2012.5718C75.6945%2015.8057%2078.2525%2019.5301%2080.1125%2023.679C81.3145%2026.3623%2082.3435%2029.1243%2083.4505%2031.8492C83.6375%2032.3111%2083.7765%2032.8053%2084.0355%2033.2246C84.6475%2034.2217%2085.7315%2034.5465%2086.8145%2034.1274C87.8715%2033.7195%2088.3955%2032.7253%2088.1515%2031.5451C88.0755%2031.1786%2087.9465%2030.8219%2087.8105%2030.4722C86.9775%2028.3103%2086.1515%2026.1476%2085.2915%2023.9968C83.1765%2018.7014%2080.1335%2013.9697%2076.2523%209.82479C72.7447%206.07839%2068.6287%203.12639%2063.7022%201.48819C57.4127%20-0.603812%2051.2075%20-0.547513%2044.9948%202.02189C39.4996%204.29209%2035.0439%207.73379%2031.711%2012.6458C31.5036%2012.9502%2031.2574%2013.2266%2031.0268%2013.5179C29.915%2013.4715%2028.8561%2013.3969%2027.7982%2013.3869C22.9432%2013.3447%2018.3994%2014.7386%2013.967%2016.5243C9.59841%2018.2828%205.56591%2020.6962%201.54961%2023.131C1.23141%2023.325%200.904509%2023.5281%200.643609%2023.7892C-0.0963912%2024.5355%20-0.200491%2025.6562%200.342808%2026.5603C0.828308%2027.3659%201.83521%2027.8%202.78011%2027.5321C3.25281%2027.3987%203.70351%2027.1552%204.13371%2026.9099C5.82041%2025.9496%207.49191%2024.9658%209.17171%2023.9963C13.5938%2021.4452%2018.2545%2019.5026%2023.2628%2018.4322C24.9852%2018.0641%2026.7172%2017.9384%2028.7371%2018.038C28.4581%2018.917%2028.271%2019.5699%2028.0472%2020.2096C26.67%2024.1467%2026.5267%2028.1778%2027.1522%2032.2608C27.6029%2035.2162%2028.8732%2037.7537%2031.2161%2039.6622C33.4854%2041.5118%2036.0875%2041.9447%2038.8101%2040.9617C41.0438%2040.156%2042.8658%2038.6736%2044.0441%2036.5888C46.8425%2031.6348%2047.0464%2026.603%2044.2229%2021.5701C42.7367%2018.9202%2040.5312%2017.0235%2037.8341%2015.6694C37.237%2015.3705%2036.645%2015.0612%2036.0884%2014.7741C36.1468%2014.5219%2036.1423%2014.3816%2036.2057%2014.2889C36.4175%2013.9774%2036.6413%2013.675%2036.879%2013.3854C39.3546%2010.384%2042.3928%208.17019%2045.9575%206.58539C50.4698%204.57989%2055.0793%204.08149%2059.8924%205.16149C64.8992%206.28519%2068.9941%208.99209%2072.5155%2012.5718ZM41.594%2029.1476C41.5152%2030.918%2041.1023%2032.5993%2040.1694%2034.1291C39.5697%2035.114%2038.7683%2035.8803%2037.7415%2036.3967C36.28%2037.1301%2034.9842%2036.9271%2033.7986%2035.8031C32.6715%2034.7343%2032.0038%2033.4128%2031.7388%2031.8996C31.0008%2027.6748%2031.4326%2023.5754%2033.1597%2019.6328C33.2535%2019.4133%2033.4078%2019.2186%2033.5245%2019.0287C38.275%2019.976%2041.8043%2024.4206%2041.594%2029.1476Z'%20fill='black'/%3e%3cpath%20fill-rule='evenodd'%20clip-rule='evenodd'%20d='M102.266%2020.8839C101.352%2020.2756%20100.13%2020.4026%2099.3588%2021.2292C99.0208%2021.5933%2098.7528%2022.026%2098.4788%2022.4428C96.5528%2025.3735%2094.6639%2028.3264%2092.6999%2031.2312C91.5439%2032.9398%2090.2908%2034.5849%2089.0488%2036.2335C88.6758%2036.7311%2088.2468%2037.2126%2087.7568%2037.5863C85.7018%2039.1532%2085.0969%2038.8619%2083.7259%2037.4394C82.5589%2036.2278%2081.4588%2034.9302%2080.4798%2033.5586C78.8108%2031.2187%2077.2609%2028.7911%2075.657%2026.4008C75.343%2025.9337%2075.0504%2025.4451%2074.6842%2025.0228C73.8576%2024.0693%2072.6388%2023.9134%2071.6428%2024.5858C70.7481%2025.1888%2070.4458%2026.3239%2070.908%2027.4234C71.0299%2027.7102%2071.1897%2027.9832%2071.3645%2028.2417C73.2453%2031.0478%2075.0782%2033.8887%2077.0405%2036.638C78.0899%2038.1092%2079.3228%2039.4556%2080.5508%2040.7855C81.4478%2041.7575%2082.5558%2042.4683%2083.8038%2042.9622C84.9038%2043.3991%2085.9788%2043.513%2087.1198%2043.0138C89.1478%2042.4708%2090.8458%2041.3176%2092.1638%2039.6644C93.5678%2037.9044%2094.9388%2036.1104%2096.2058%2034.251C98.3208%2031.1475%20100.341%2027.9792%20102.398%2024.8354C102.636%2024.4693%20102.888%2024.1036%20103.065%2023.7065C103.522%2022.6733%20103.169%2021.4844%20102.266%2020.8839Z'%20fill='black'/%3e%3c/g%3e%3cdefs%3e%3cclipPath%20id='clip0_1990_7380'%3e%3crect%20width='103'%20height='43'%20fill='white'/%3e%3c/clipPath%3e%3c/defs%3e%3c/svg%3e)

No spam. Only free content, news, and ever more resources to level up your skills!
 Join +1500 developers
No comments yet