 Our online courses
 HTML/CSS
 JavaScript
'%3e%3cpath%20d='M23.5602%2010.93L13.0602%200.430002C12.774%200.158498%2012.3946%200.00714111%2012.0002%200.00714111C11.6057%200.00714111%2011.2263%200.158498%2010.9402%200.430002L8.94018%202.43C8.89332%202.47648%208.85612%202.53178%208.83074%202.59271C8.80535%202.65364%208.79228%202.719%208.79228%202.785C8.79228%202.85101%208.80535%202.91636%208.83074%202.97729C8.85612%203.03822%208.89332%203.09352%208.94018%203.14L10.7402%205C10.8095%205.06923%2010.8977%205.11656%2010.9937%205.13611C11.0897%205.15567%2011.1893%205.14659%2011.2802%205.11C11.5851%204.99232%2011.9142%204.95115%2012.2387%204.9901C12.5632%205.02905%2012.8732%205.14693%2013.1416%205.33342C13.41%205.51992%2013.6286%205.76934%2013.7782%206.05988C13.9279%206.35041%2014.0041%206.6732%2014.0002%207C13.9976%207.25396%2013.9467%207.5051%2013.8502%207.74C13.8136%207.83089%2013.8045%207.93052%2013.8241%208.02652C13.8436%208.12253%2013.891%208.21067%2013.9602%208.28L15.7202%2010C15.7895%2010.0692%2015.8777%2010.1166%2015.9737%2010.1361C16.0697%2010.1557%2016.1693%2010.1466%2016.2602%2010.11C16.6565%209.95224%2017.0928%209.9253%2017.5055%2010.0331C17.9182%2010.1409%2018.2856%2010.3779%2018.554%2010.7093C18.8225%2011.0407%2018.978%2011.4493%2018.9978%2011.8754C19.0176%2012.3014%2018.9006%2012.7227%2018.664%2013.0776C18.4274%2013.4325%2018.0836%2013.7024%2017.6827%2013.848C17.2818%2013.9936%2016.8448%2014.0073%2016.4356%2013.8869C16.0264%2013.7666%2015.6664%2013.5185%2015.4082%2013.1791C15.1499%2012.8396%2015.007%2012.4265%2015.0002%2012C15.0033%2011.7568%2015.0507%2011.5162%2015.1402%2011.29C15.1747%2011.2004%2015.1826%2011.1028%2015.1631%2011.0088C15.1436%2010.9148%2015.0975%2010.8285%2015.0302%2010.76L13.3502%209.07C13.2803%209.00148%2013.1918%208.95498%2013.0958%208.93626C12.9997%208.91754%2012.9003%208.92742%2012.8098%208.96469C12.7193%209.00195%2012.6417%209.06496%2012.5867%209.14589C12.5316%209.22683%2012.5016%209.32214%2012.5002%209.42V14.7C12.4998%2014.7976%2012.5281%2014.8931%2012.5814%2014.9749C12.6347%2015.0566%2012.7107%2015.121%2012.8002%2015.16C13.2213%2015.3438%2013.5663%2015.667%2013.7772%2016.0752C13.988%2016.4835%2014.0519%2016.9519%2013.958%2017.4017C13.8641%2017.8514%2013.6182%2018.2552%2013.2617%2018.545C12.9051%2018.8348%2012.4597%2018.993%2012.0002%2018.993C11.5407%2018.993%2011.0952%2018.8348%2010.7387%2018.545C10.3821%2018.2552%2010.1362%2017.8514%2010.0424%2017.4017C9.9485%2016.9519%2010.0124%2016.4835%2010.2232%2016.0752C10.4341%2015.667%2010.7791%2015.3438%2011.2002%2015.16C11.2896%2015.121%2011.3657%2015.0566%2011.419%2014.9749C11.4723%2014.8931%2011.5005%2014.7976%2011.5002%2014.7V9.28C11.5005%209.18242%2011.4723%209.08687%2011.419%209.00513C11.3657%208.92339%2011.2896%208.85904%2011.2002%208.82C10.7271%208.61271%2010.3526%208.23047%2010.1551%207.7533C9.95748%207.27612%209.95215%206.74102%2010.1402%206.26C10.171%206.16762%2010.1742%206.06826%2010.1493%205.97411C10.1244%205.87995%2010.0726%205.79511%2010.0002%205.73L8.19018%203.88C8.1437%203.83314%208.0884%203.79594%208.02747%203.77056C7.96654%203.74517%207.90119%203.7321%207.83518%203.7321C7.76918%203.7321%207.70383%203.74517%207.6429%203.77056C7.58197%203.79594%207.52667%203.83314%207.48018%203.88L0.480184%2010.88C0.199283%2011.1613%200.0415039%2011.5425%200.0415039%2011.94C0.0415039%2012.3375%200.199283%2012.7188%200.480184%2013L10.9802%2023.51C11.2614%2023.7909%2011.6427%2023.9487%2012.0402%2023.9487C12.4377%2023.9487%2012.8189%2023.7909%2013.1002%2023.51L23.6002%2013C23.8811%2012.7188%2024.0389%2012.3375%2024.0389%2011.94C24.0389%2011.5425%2023.8811%2011.1613%2023.6002%2010.88L23.5602%2010.93Z'%20fill='white'/%3e%3c/g%3e%3cdefs%3e%3cclipPath%20id='clip0_1481_6122'%3e%3crect%20width='24'%20height='24'%20fill='white'/%3e%3c/clipPath%3e%3c/defs%3e%3c/svg%3e) Git
Git'%3e%3cpath%20d='M16.6011%202.00588H15.7556L15.7372%201.99342C15.0469%201.51665%2013.7032%200.590486%2011.8634%200.855279C11.8664%200.859491%2011.8678%200.864404%2011.8706%200.868615C10.5059%201.09463%208.97767%202.15872%208.46774%203.59394C7.97588%204.97669%208.35649%206.63985%209.60026%208.53868L11.5022%2011.4449C14.3783%2010.0069%2014.2755%207.81624%2014.2142%206.50737C14.2051%206.31452%2014.1991%206.17502%2014.1991%206.05113C14.1991%205.67842%2014.5008%205.37695%2014.8733%205.37695C15.246%205.37695%2015.5475%205.67842%2015.5475%206.05113C15.5475%206.15589%2015.5535%206.27433%2015.5594%206.40278C15.6279%207.8645%2015.7661%2010.8206%2012.1054%2012.651C11.8769%2012.7654%2011.4979%2012.9909%2011.2673%2012.9909C11.046%2012.9909%2010.8307%2012.8822%2010.7024%2012.6861L8.47178%209.27743C6.98567%207.00712%206.55645%204.943%207.19694%203.14226C7.3396%202.7413%207.53614%202.39631%207.75057%202.07572C3.41438%202.59969%200.00470058%206.30276%200.0029458%2010.8679C-0.0130225%2011.5476%20-0.0270607%2013.6156%201.77508%2016.2716C2.40451%2017.2%202.73774%2018.3601%202.73774%2019.6268V21.558C2.73774%2021.9307%203.03921%2022.2321%203.41192%2022.2321H6.10864C6.48135%2022.2321%206.77387%2021.9307%206.77387%2021.558V18.1869H9.47971V21.558C9.47971%2021.9307%209.78136%2022.2321%2010.1541%2022.2321H12.8508C13.2235%2022.2321%2013.516%2021.9307%2013.516%2021.558C13.516%2018.9434%2014.0603%2016.6015%2015.1625%2014.3978L15.9283%2012.8663L17.2293%2013.083C18.2082%2013.2462%2018.9187%2014.085%2018.9187%2015.078V16.1643C18.9187%2016.7167%2018.1609%2017.0328%2017.7678%2016.6409C17.5046%2016.3776%2017.0778%2016.3776%2016.8144%2016.6409L14.9089%2018.5464C14.6457%2018.8098%2014.6457%2019.2364%2014.9089%2019.4998C16.0501%2020.6421%2017.6769%2021.1082%2019.2571%2020.7462C21.2666%2020.2859%2023%2018.0539%2023%2015.8725V8.36864C23%204.86%2020.1099%202.00588%2016.6011%202.00588ZM18.2446%208.74802C17.8724%208.74802%2017.5704%208.44603%2017.5704%208.07367C17.5704%207.70131%2017.8724%207.39949%2018.2446%207.39949C18.6169%207.39949%2018.9189%207.70131%2018.9189%208.07367C18.9189%208.44603%2018.6169%208.74802%2018.2446%208.74802Z'%20fill='white'/%3e%3c/g%3e%3cdefs%3e%3cclipPath%20id='clip0_1481_6112'%3e%3crect%20width='23'%20height='23'%20fill='white'/%3e%3c/clipPath%3e%3c/defs%3e%3c/svg%3e) PHP
PHP Freelance
'%3e%3cpath%20d='M1.41413%2011.974C1.49937%2011.9879%201.58563%2011.9944%201.67193%2011.9932L16.3679%2011.9933L16.0474%2012.1435C15.7342%2012.293%2015.4492%2012.4964%2015.2053%2012.7445L11.0842%2016.899C10.5414%2017.4214%2010.4502%2018.2616%2010.8681%2018.8899C11.3544%2019.5594%2012.287%2019.7048%2012.9512%2019.2145C13.0048%2019.1749%2013.0558%2019.1317%2013.1038%2019.0852L20.556%2011.5725C21.1384%2010.9861%2021.1389%2010.0347%2020.5572%209.44762C20.5568%209.44725%2020.5564%209.44682%2020.556%209.44645L13.1038%201.93376C12.5209%201.34781%2011.5772%201.34913%2010.9959%201.93671C10.9502%201.98296%2010.9075%202.03217%2010.8681%202.08401C10.4502%202.7123%2010.5414%203.55255%2011.0842%204.07487L15.1978%208.2369C15.4165%208.45759%2015.6679%208.64264%2015.9431%208.78533L16.3902%208.98817L1.75396%208.98817C0.992568%208.95967%200.324563%209.49584%200.181527%2010.2503C0.0497616%2011.0694%200.601603%2011.8411%201.41413%2011.974Z'%20fill='white'/%3e%3c/g%3e%3cdefs%3e%3cclipPath%20id='clip0_520_10'%3e%3crect%20width='20.8311'%20height='21'%20fill='white'%20transform='translate(20.9932%2021)%20rotate(-180)'/%3e%3c/clipPath%3e%3c/defs%3e%3c/svg%3e)
'%3e%3cpath%20d='M50.2142%2018.9386C49.891%2017.9389%2049.0043%2017.2289%2047.9552%2017.1343L33.7053%2015.8404L28.0704%202.65157C27.655%201.685%2026.7087%201.05933%2025.6574%201.05933C24.6061%201.05933%2023.6599%201.685%2023.2444%202.65383L17.6096%2015.8404L3.35734%2017.1343C2.31016%2017.2311%201.42571%2017.9389%201.10063%2018.9386C0.775554%2019.9383%201.07577%2021.0349%201.86794%2021.7261L12.6392%2031.1726L9.46301%2045.1637C9.2306%2046.1924%209.62988%2047.2558%2010.4834%2047.8728C10.9423%2048.2043%2011.479%2048.3731%2012.0203%2048.3731C12.487%2048.3731%2012.95%2048.2473%2013.3655%2047.9986L25.6574%2040.6522L37.9448%2047.9986C38.844%2048.5396%2039.9774%2048.4902%2040.8291%2047.8728C41.683%2047.2539%2042.0819%2046.1902%2041.8495%2045.1637L38.6733%2031.1726L49.4446%2021.728C50.2368%2021.0349%2050.5393%2019.9402%2050.2142%2018.9386Z'%20fill='%23FFC107'/%3e%3c/g%3e%3cdefs%3e%3cclipPath%20id='clip0_1229_10547'%3e%3crect%20width='49.3714'%20height='49.3714'%20fill='white'%20transform='translate(0.971436)'/%3e%3c/clipPath%3e%3c/defs%3e%3c/svg%3e)
'%3e%3cpath%20d='M18.6283%2023.5149C18.8912%2023.5149%2019.1524%2023.4328%2019.3752%2023.2717C19.7903%2022.9708%2019.9842%2022.4537%2019.8712%2021.9548L18.3273%2015.1535L23.5635%2010.5615C23.9484%2010.2255%2024.0954%209.69335%2023.9374%209.20646C23.7794%208.72049%2023.3494%208.37642%2022.8404%208.32936L15.9122%207.70038L13.1731%201.29024C12.9711%200.819283%2012.5111%200.515137%2012.0001%200.515137C11.489%200.515137%2011.029%200.819283%2010.8271%201.28914L8.08792%207.70038L1.16086%208.32936C0.650715%208.37532%200.220772%208.72049%200.062748%209.20646C-0.0952761%209.69243%200.0508457%2010.2255%200.435743%2010.5615L5.67196%2015.1526L4.12798%2021.9537C4.01482%2022.4537%204.20891%2022.9708%204.62384%2023.2708C5.03785%2023.5707%205.58993%2023.5938%206.02592%2023.3318L12.0001%2019.7617L17.9742%2023.3338C18.1762%2023.4537%2018.4012%2023.5149%2018.6283%2023.5149ZM12.0001%2018C12%2017.7763%2012.0001%2017.5%2012.0001%2017.5V17V16C12%2015.5%2012%2015%2012.0001%2014.5V12.5V11.5C12%2011%2012.0001%209.18247%2012.0001%209.18247V2.36217L14.5852%208.41231C14.7672%208.84335%2015.1723%209.13944%2015.6421%209.18247L22.1843%209.77648L17.2403%2014.1125C16.8862%2014.4225%2016.7313%2014.8986%2016.8362%2015.3566L18.2923%2021.7757L12.6541%2018.4046C12.4522%2018.2847%2012.0001%2018%2012.0001%2018Z'%20fill='%23FFC107'/%3e%3c/g%3e%3cdefs%3e%3cclipPath%20id='clip0_1843_3872'%3e%3crect%20width='24'%20height='24'%20fill='white'%20transform='matrix(-1%200%200%201%2024%200)'/%3e%3c/clipPath%3e%3c/defs%3e%3c/svg%3e) 4.8 average rating
4.8 average rating
Tutorial: How to Create a Chrome Extension in 5 Minutes

NicolasBrondinBernard
An example of a basic Chrome extension, the code is available on Github!
Article published on 04/11/2020, last updated on 10/08/2026
I recently shared several extensions for Google Chrome in my article "The 4 best tools to test the accessibility of a website", so it's only natural that today I show you the process to create your own Chrome extension in a few minutes.
First, let's see what a most basic extension is made of:
- A manifest
- An icon
- An html file
- And that's it.
The manifest allows you to declare all the information and metadata related to the extension, and the html file will contain the code that will appear in the popup when you click on the extension.
The code
I decided to show you the simplest possible extension, so I opted for a simple popup that displays a button, which, when clicked, opens a new tab pointing to my website.
Note that a Chrome extension can be very powerful and offer many possibilities, I opted for the simplest possible extension for this introduction as an advanced tutorial is also in preparation.
The manifest
The manifest is a simple JSON file, like this:
{
  "manifest_version": 2,

  "name": "Basic Chrome Extension",
  "description": "This extension is for education purpose",
  "version": "1.0",

  "browser_action": {
   "default_icon": "icon.png",
   "default_popup": "popup.html"
  },
  "permissions": ["tabs"]
}
There isn't much to say about this manifest, it's very simple and must be placed at the root of the project, for the list of all available permissions, here is the official documentation.
HTML and Javascript
Since the entry point is a simple html file, it is possible to keep the same structure as a classic web project, so I separated the content of my popup into three files: popup.html, popup.css and popup.js
The popup.html contains all the code that will be displayed in the popup, but be careful, it will be executed ONLY when you have clicked the button to launch the extension, not before!
<!--popup.html-->
<!DOCTYPE html>
<html>
    <head>
        <link href="./popup.css" rel="stylesheet"/>
    </head>
    <body>
        <button id="openBtn">Ouvrir mon site</button>
        <script type="text/javascript" src="popup.js"></script>
    </body>
</html>
The behavior is the one described previously: we create a button, to which we assign a function that will open a url when clicked.
//popup.js
function OpenURL() {
    chrome.tabs.create({ url: "https://nicolas.brondin-bernard.com" });
}
document.getElementById("openBtn").addEventListener("click", OpenURL);
Be careful, Google Chrome's Content Security Policies forbid passing a function by adding an onClick attribute in the html, the binding must necessarily be done on the Javascript side.
Once all the files have been created, all we have to do is test the extension, and if you want to find all the code from this tutorial, it is available on the GitHub repository below:
 NicolasBrondin/basic-chrome-extension
Installing the extension
To do this, simply open Google Chrome, and type chrome://extensions in the search bar, then press enter. The extensions management page will appear, all that's left for you to do is:
- Enable developer mode
- Load your extension
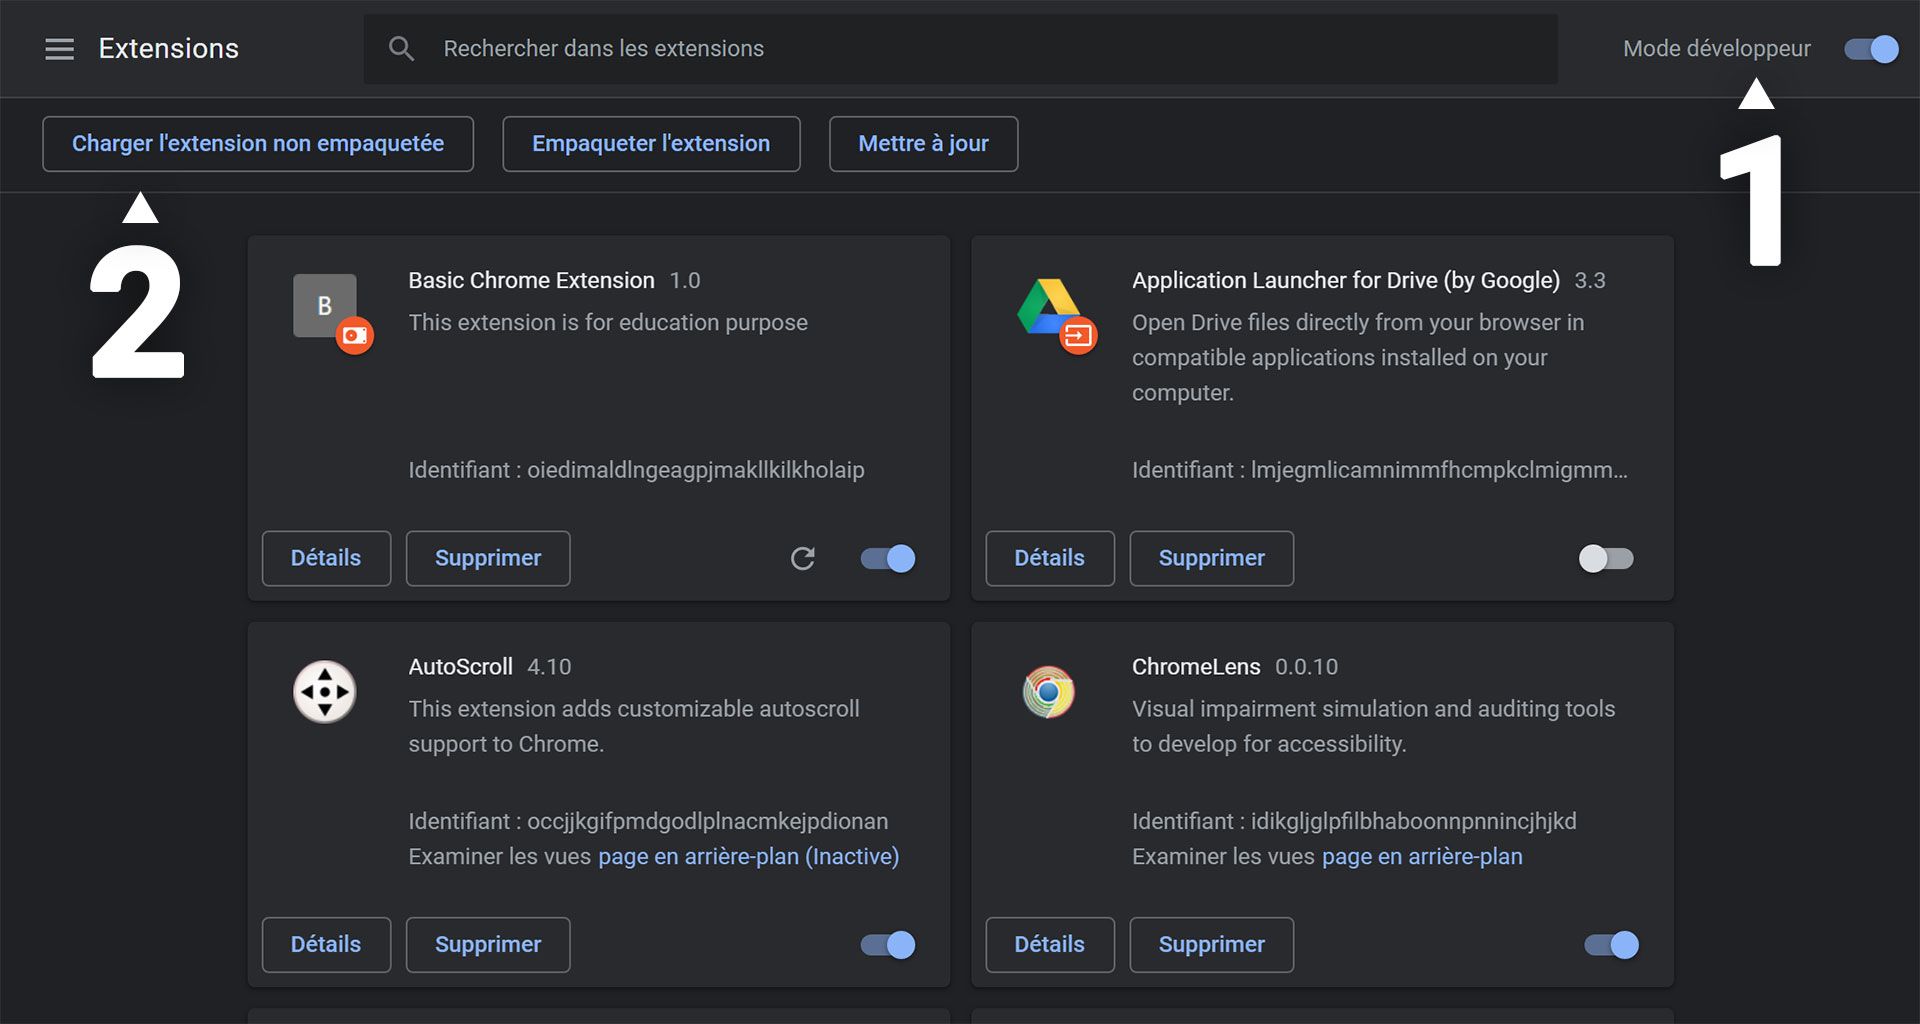
Once your extension's folder is selected, all that's left for you to do is find it in your menu bar on Google Chrome, click on it and there you go!
 Our newsletter
'%3e%3cpath%20fill-rule='evenodd'%20clip-rule='evenodd'%20d='M72.5155%2012.5718C75.6945%2015.8057%2078.2525%2019.5301%2080.1125%2023.679C81.3145%2026.3623%2082.3435%2029.1243%2083.4505%2031.8492C83.6375%2032.3111%2083.7765%2032.8053%2084.0355%2033.2246C84.6475%2034.2217%2085.7315%2034.5465%2086.8145%2034.1274C87.8715%2033.7195%2088.3955%2032.7253%2088.1515%2031.5451C88.0755%2031.1786%2087.9465%2030.8219%2087.8105%2030.4722C86.9775%2028.3103%2086.1515%2026.1476%2085.2915%2023.9968C83.1765%2018.7014%2080.1335%2013.9697%2076.2523%209.82479C72.7447%206.07839%2068.6287%203.12639%2063.7022%201.48819C57.4127%20-0.603812%2051.2075%20-0.547513%2044.9948%202.02189C39.4996%204.29209%2035.0439%207.73379%2031.711%2012.6458C31.5036%2012.9502%2031.2574%2013.2266%2031.0268%2013.5179C29.915%2013.4715%2028.8561%2013.3969%2027.7982%2013.3869C22.9432%2013.3447%2018.3994%2014.7386%2013.967%2016.5243C9.59841%2018.2828%205.56591%2020.6962%201.54961%2023.131C1.23141%2023.325%200.904509%2023.5281%200.643609%2023.7892C-0.0963912%2024.5355%20-0.200491%2025.6562%200.342808%2026.5603C0.828308%2027.3659%201.83521%2027.8%202.78011%2027.5321C3.25281%2027.3987%203.70351%2027.1552%204.13371%2026.9099C5.82041%2025.9496%207.49191%2024.9658%209.17171%2023.9963C13.5938%2021.4452%2018.2545%2019.5026%2023.2628%2018.4322C24.9852%2018.0641%2026.7172%2017.9384%2028.7371%2018.038C28.4581%2018.917%2028.271%2019.5699%2028.0472%2020.2096C26.67%2024.1467%2026.5267%2028.1778%2027.1522%2032.2608C27.6029%2035.2162%2028.8732%2037.7537%2031.2161%2039.6622C33.4854%2041.5118%2036.0875%2041.9447%2038.8101%2040.9617C41.0438%2040.156%2042.8658%2038.6736%2044.0441%2036.5888C46.8425%2031.6348%2047.0464%2026.603%2044.2229%2021.5701C42.7367%2018.9202%2040.5312%2017.0235%2037.8341%2015.6694C37.237%2015.3705%2036.645%2015.0612%2036.0884%2014.7741C36.1468%2014.5219%2036.1423%2014.3816%2036.2057%2014.2889C36.4175%2013.9774%2036.6413%2013.675%2036.879%2013.3854C39.3546%2010.384%2042.3928%208.17019%2045.9575%206.58539C50.4698%204.57989%2055.0793%204.08149%2059.8924%205.16149C64.8992%206.28519%2068.9941%208.99209%2072.5155%2012.5718ZM41.594%2029.1476C41.5152%2030.918%2041.1023%2032.5993%2040.1694%2034.1291C39.5697%2035.114%2038.7683%2035.8803%2037.7415%2036.3967C36.28%2037.1301%2034.9842%2036.9271%2033.7986%2035.8031C32.6715%2034.7343%2032.0038%2033.4128%2031.7388%2031.8996C31.0008%2027.6748%2031.4326%2023.5754%2033.1597%2019.6328C33.2535%2019.4133%2033.4078%2019.2186%2033.5245%2019.0287C38.275%2019.976%2041.8043%2024.4206%2041.594%2029.1476Z'%20fill='black'/%3e%3cpath%20fill-rule='evenodd'%20clip-rule='evenodd'%20d='M102.266%2020.8839C101.352%2020.2756%20100.13%2020.4026%2099.3588%2021.2292C99.0208%2021.5933%2098.7528%2022.026%2098.4788%2022.4428C96.5528%2025.3735%2094.6639%2028.3264%2092.6999%2031.2312C91.5439%2032.9398%2090.2908%2034.5849%2089.0488%2036.2335C88.6758%2036.7311%2088.2468%2037.2126%2087.7568%2037.5863C85.7018%2039.1532%2085.0969%2038.8619%2083.7259%2037.4394C82.5589%2036.2278%2081.4588%2034.9302%2080.4798%2033.5586C78.8108%2031.2187%2077.2609%2028.7911%2075.657%2026.4008C75.343%2025.9337%2075.0504%2025.4451%2074.6842%2025.0228C73.8576%2024.0693%2072.6388%2023.9134%2071.6428%2024.5858C70.7481%2025.1888%2070.4458%2026.3239%2070.908%2027.4234C71.0299%2027.7102%2071.1897%2027.9832%2071.3645%2028.2417C73.2453%2031.0478%2075.0782%2033.8887%2077.0405%2036.638C78.0899%2038.1092%2079.3228%2039.4556%2080.5508%2040.7855C81.4478%2041.7575%2082.5558%2042.4683%2083.8038%2042.9622C84.9038%2043.3991%2085.9788%2043.513%2087.1198%2043.0138C89.1478%2042.4708%2090.8458%2041.3176%2092.1638%2039.6644C93.5678%2037.9044%2094.9388%2036.1104%2096.2058%2034.251C98.3208%2031.1475%20100.341%2027.9792%20102.398%2024.8354C102.636%2024.4693%20102.888%2024.1036%20103.065%2023.7065C103.522%2022.6733%20103.169%2021.4844%20102.266%2020.8839Z'%20fill='black'/%3e%3c/g%3e%3cdefs%3e%3cclipPath%20id='clip0_1990_7380'%3e%3crect%20width='103'%20height='43'%20fill='white'/%3e%3c/clipPath%3e%3c/defs%3e%3c/svg%3e)

No spam. Only free content, news, and ever more resources to level up your skills!
 Join +1500 developers
No comments yet